四、识别和跟踪图像
本章的目标是将图像跟踪添加到 Second Sight。 我们将训练该应用以识别某些任意的矩形图像(例如绘画),并确定它们在 2D 投影中的姿势。 当该应用出现在相机源中时,它将在跟踪的图像周围绘制轮廓。 所有的跟踪和绘制都是使用 OpenCV 而不是其他 Android 库完成的。
注意
可以从作者的网站下载本章的完整 Eclipse 项目。 该项目有两个版本:
OpenCV 3.x 的版本位于这个页面。
位于这个页面的 OpenCV 2.x 版本。
将文件添加到项目
对于本章,我们需要添加一个新类com.nummist.secondsight.filters.ar.ImageDetectionFilter。 我们还需要添加一些资源文件,即我们要跟踪的图像。 从这个页面下载图像,将其解压缩,并将其放入项目的res/drawable-nodpi文件夹中。
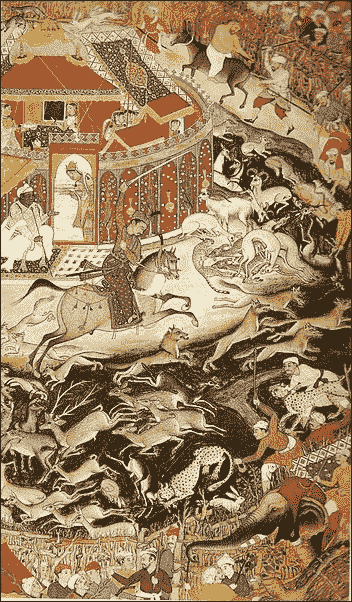
这些图像是 19 世纪荷兰画家文森特·梵高和 16 世纪印度画家 Basawan。 我们的跟踪器可以很好地处理这些图像,因为它们包含许多高对比度的细节,而无需重复很多图案。 因此,是,可以在每个图像的大多数部分中进行跟踪。 例如,这是巴沙旺(Basawan)的一幅画作《阿克巴猎豹》:
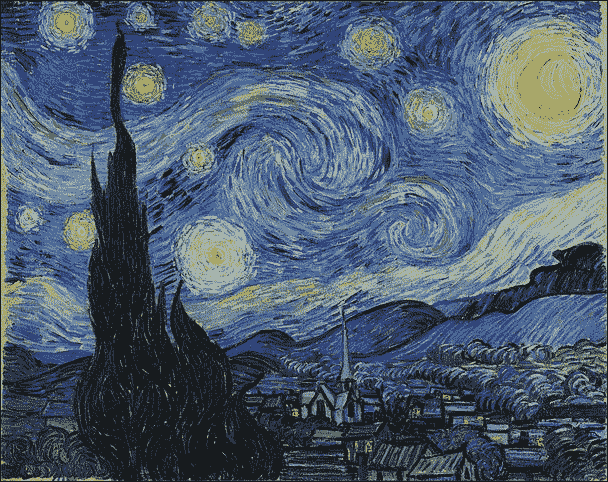
这是文森特·梵高的画作之一《星空》:
了解图像跟踪
想象下面的对话:
A:我找不到《星空》的印刷品。 你知道在哪里吗?
B:看起来像什么?
对于计算机或对于西方艺术无知的人,B 的问题是很合理的。 在我们可以使用视感(或其他感官)来追踪某物之前,我们需要先感知到该物。 否则,我们至少需要对我们将要感知到的东西有一个很好的描述。 对于计算机视觉,我们必须提供参考图像,它将与实时摄像机图像或场景进行比较。 如果目标具有复杂的几何形状或运动部件,我们可能需要提供许多参考图像以说明不同的视角和姿势。 但是,对于使用著名绘画的示例,我们将假定目标是矩形且刚性的。
注意
Google 的按图像搜索是流行工具的示例,该工具要求用户提供参考图像。 如果您以前从未使用过它,请转到这个页面,单击相机图标,然后通过输入 URL 或上传文件来提供参考图像。 搜索结果应包括匹配或相似的图像。 该工具可以帮助想要验证图像原始来源的研究人员。
出于本章的目的,我们说跟踪的目的是确定如何在 3D 中放置矩形目标。 有了这些信息,我们就可以围绕目标绘制轮廓。 在最终的 2D 图像中,轮廓将为四边形。 (它不一定是矩形,因为目标可能会偏离相机。)
这种跟踪涉及四个主要步骤:
- 在参考图像和场景中找到特征。 从不同的距离或角度观察时,特征是可能保持相似外观的点。 例如,角点经常具有这种特性。 请参阅这个页面和这个页面。
- 为每组特征(参考和场景特征)找到描述符。 描述符是有关特征的数据向量。 某些功能不适合生成描述符,因此图像比特征具有更少的描述符。 参见这个页面。
- 查找两组描述符(参考和场景描述符)之间的匹配项。 如果我们将描述符想象为多维空间中的点,则根据点之间的距离度量来定义匹配。 彼此距离足够近的描述符被视为匹配项。 当一对描述符是匹配项时,我们也可以说基础特征对是匹配项。
- 在场景中的参考图像和匹配图像之间找到单应性。 单应性是一种 3D 变换,需要将两个投影的 2D 图像对齐(或尽可能靠近以对齐它们)。 它是基于两个图像的匹配特征点计算的。 通过将单应性应用于矩形,我们可以获得跟踪对象的轮廓。 参见这个页面。
有很多不同的技术可以执行前三个步骤。 OpenCV 提供了称为FeatureDetector,DescriptorExtractor和DescriptorMatcher分别支持几种技术。 我们将使用 OpenCV 称为FeatureDetector.ORB,DescriptorExtractor.ORB和DescriptorMatcher.BRUTEFORCE_HAMMINGLUT的技术组合。 这种组合是相对快速且鲁棒的。 与某些替代方案不同,它是缩放不变的和旋转不变的,这意味着可以在各种放大倍率,分辨率或距离下跟踪目标,并且从各个角度来看。 另外,与其他替代方案不同,它没有专利权,因此即使在商业应用中也可以免费使用。
注意
有关 ORB 的描述,其他技术及其相对优点,请参阅 Gil Levi 博客上二进制描述符的多部分教程。 作为该主题的先驱,另请参见描述符简介。
BahinIşık 和 KemalÖzkan 撰写的《对知名特征检测器和描述符的比较评估》是 ORB 及其替代品的另一个很好的来源。 可在这个页面上获得本文的电子版本。
最后,有关 OpenCV 中实现的 ORB 和替代方案的基准,请参阅 Ievgen Khvedchenya 的特征检测器和描述符提取器的博客文章。
在撰写本文时,OpenCV 的特征检测器仅支持灰度图像。 就我们的目的而言,此限制并不是很糟糕,因为用于灰度特征检测的算法比用于颜色特征检测的算法要快。 在移动设备上,我们必须进行节能以保持实时视频的合理速度,并且在每帧的灰度版本上运行计算机视觉功能是一种节能的方法。 但是,为了获得最佳结果,我们应确保选择的目标图像在转换为灰度时仍具有很强的对比度。
以下伪代码表示 OpenCV 中使用的标准灰度转换公式:
grayValue(r, g, b) = (0.299 * r) + (0.587 * g) + (0.114 * b)
前面的公式在保留蓝黄色对比度(其中黄色是红色加绿色)以及当然在黑白对比度方面最有效。 例如,此标准灰度转换在《星空》中保持对比度方面做得很好,该调色板具有主要由蓝色,黄色,黑色和白色组成的调色板。
编写图像跟踪过滤器
我们将把我们的跟踪器编写为在上一章中创建的Filter接口的实现。 追踪器的类别名称将为ImageDetectionFilter。 作为成员变量,此类具有FeatureDetector,DescriptorExtractor和DescriptorMatcher的实例,以及几个Mat实例,这些实例存储图像数据以及跟踪计算的中间或最终结果。 之所以存储其中一些结果,是因为它们在不同的帧之间不会改变。 之所以存储其他文件,是因为它比为每个帧重新创建Mat实例更有效。 类和成员变量的声明如下:
public class ImageDetectionFilter implements Filter {

  // The reference image (this detector's target).
  private final Mat mReferenceImage;
  // Features of the reference image.
  private final MatOfKeyPoint mReferenceKeypoints =
    new MatOfKeyPoint();
  // Descriptors of the reference image's features.
  private final Mat mReferenceDescriptors = new Mat();
  // The corner coordinates of the reference image, in pixels.
  // CvType defines the color depth, number of channels, and
  // channel layout in the image. Here, each point is represented
  // by two 32-bit floats.
  private final Mat mReferenceCorners =
    new Mat(4, 1, CvType.CV_32FC2);

  // Features of the scene (the current frame).
  private final MatOfKeyPoint mSceneKeypoints =
    new MatOfKeyPoint();
  // Descriptors of the scene's features.
  private final Mat mSceneDescriptors = new Mat();
  // Tentative corner coordinates detected in the scene, in
  // pixels.
  private final Mat mCandidateSceneCorners =
    new Mat(4, 1, CvType.CV_32FC2);
  // Good corner coordinates detected in the scene, in pixels.
  private final Mat mSceneCorners = new Mat(4, 1,
    CvType.CV_32FC2);
  // The good detected corner coordinates, in pixels, as integers.
  private final MatOfPoint mIntSceneCorners = new MatOfPoint();

  // A grayscale version of the scene.
  private final Mat mGraySrc = new Mat();
  // Tentative matches of scene features and reference features.
  private final MatOfDMatch mMatches = new MatOfDMatch();

  // A feature detector, which finds features in images.
  private final FeatureDetector mFeatureDetector =
    FeatureDetector.create(FeatureDetector.ORB);
  // A descriptor extractor, which creates descriptors of
  // features.
  private final DescriptorExtractor mDescriptorExtractor =
    DescriptorExtractor.create(DescriptorExtractor.ORB);
  // A descriptor matcher, which matches features based on their
  // descriptors.
  private final DescriptorMatcher mDescriptorMatcher =
    DescriptorMatcher.create(
      DescriptorMatcher.BRUTEFORCE_HAMMINGLUT);

  // The color of the outline drawn around the detected image.
  private final Scalar mLineColor = new Scalar(0, 255, 0);
我们想要一种方便的方法来制作任意图像的图像跟踪器。 我们可以使用我们的应用将图像打包为可绘制资源,这些资源可以由任何 Android Context子类(例如Activity)加载。 因此,我们提供了一个构造器ImageDetectionFilter(final Context context, final int referenceImageResourceID),该构造器使用给定的Context和资源标识符加载参考图像。 图像的 RGBA 和灰度版本存储在成员变量中。 图像的角点也将被存储,其特征和描述符也将被存储。 构造器的代码如下:
  public ImageDetectionFilter(final Context context,
    final int referenceImageResourceID) throws IOException {

    // Load the reference image from the app's resources.
    // It is loaded in BGR (blue, green, red) format.
    mReferenceImage = Utils.loadResource(context,
      referenceImageResourceID,
      Imgcodecs.CV_LOAD_IMAGE_COLOR);

    // Create grayscale and RGBA versions of the reference image.
    final Mat referenceImageGray = new Mat();
    Imgproc.cvtColor(mReferenceImage, referenceImageGray,
      Imgproc.COLOR_BGR2GRAY);
    Imgproc.cvtColor(mReferenceImage, mReferenceImage,
      Imgproc.COLOR_BGR2RGBA);

    // Store the reference image's corner coordinates, in pixels.
    mReferenceCorners.put(0, 0,
      new double[] {0.0, 0.0});
    mReferenceCorners.put(1, 0,
      new double[] {referenceImageGray.cols(), 0.0});
    mReferenceCorners.put(2, 0,
      new double[] {referenceImageGray.cols(),
      referenceImageGray.rows()});
    mReferenceCorners.put(3, 0,
      new double[] {0.0, referenceImageGray.rows()});

    // Detect the reference features and compute their
    // descriptors.
    mFeatureDetector.detect(referenceImageGray,
      mReferenceKeypoints);
    mDescriptorExtractor.compute(referenceImageGray,
      mReferenceKeypoints, mReferenceDescriptors);
  }
提示
使代码适配 OpenCV 2.x
将Imgcodecs.CV_LOAD_IMAGE_COLOR替换为Highgui.CV_LOAD_IMAGE_COLOR。
回想一下Filter接口声明了一种方法apply(final Mat src, final Mat dst)。 我们对这种方法的实现将特征检测器,描述符提取器和描述符匹配器应用于源图像的灰度版本。 然后,我们调用帮助程序函数,该函数查找被跟踪目标的四个角(如果有),并绘制四边形轮廓。 代码如下:
  @Override
  public void apply(final Mat src, final Mat dst) {

    // Convert the scene to grayscale.
    Imgproc.cvtColor(src, mGraySrc, Imgproc.COLOR_RGBA2GRAY);

    // Detect the scene features, compute their descriptors,
    // and match the scene descriptors to reference descriptors.
    mFeatureDetector.detect(mGraySrc, mSceneKeypoints);
    mDescriptorExtractor.compute(mGraySrc, mSceneKeypoints,
      mSceneDescriptors);
    mDescriptorMatcher.match(mSceneDescriptors,
      mReferenceDescriptors, mMatches);

    // Attempt to find the target image's corners in the scene.
    findSceneCorners();

    // If the corners have been found, draw an outline around the
    // target image.
    // Else, draw a thumbnail of the target image.    draw(src, dst);
  }
findSceneCorners()辅助方法是一个更大的代码块,但是很多方法只是简单地遍历匹配项以汇编最佳列表。 如果所有匹配都非常差(如较大的距离值所示),则假定目标不在场景中,并且清除之前对其角点位置的任何估计。 如果比赛既不好也不好,我们假定目标在场景中的某个地方,但是我们保留其先前估计的角点位置。 此政策有助于我们稳定对角点位置的估计。 最后,如果匹配良好且至少有四个匹配项,我们找到单应性并使用它来更新估计的角点位置。
注意
有关查找单应性的数学描述,请参见官方 OpenCV 文档。
findSceneCorners()的实现如下:
  private void findSceneCorners() {

    List<DMatch> matchesList = mMatches.toList();
    if (matchesList.size() < 4) {
      // There are too few matches to find the homography.
      return;
    }

    List<KeyPoint> referenceKeypointsList =
      mReferenceKeypoints.toList();
    List<KeyPoint> sceneKeypointsList =
      mSceneKeypoints.toList();

    // Calculate the max and min distances between keypoints.
    double maxDist = 0.0;
    double minDist = Double.MAX_VALUE;
    for(DMatch match : matchesList) {
      double dist = match.distance;
      if (dist < minDist) {
        minDist = dist;
      }
      if (dist > maxDist) {
        maxDist = dist;
      }
    }

    // The thresholds for minDist are chosen subjectively
    // based on testing. The unit is not related to pixel
    // distances; it is related to the number of failed tests
    // for similarity between the matched descriptors.
    if (minDist > 50.0) {
      // The target is completely lost.
      // Discard any previously found corners.
      mSceneCorners.create(0, 0, mSceneCorners.type());
      return;
    } else if (minDist > 25.0) {
      // The target is lost but maybe it is still close.
      // Keep any previously found corners.
      return;
    }

    // Identify "good" keypoints based on match distance.
    ArrayList<Point> goodReferencePointsList =
      new ArrayList<Point>();
    ArrayList<Point> goodScenePointsList =
      new ArrayList<Point>();
    double maxGoodMatchDist = 1.75 * minDist;
    for(DMatch match : matchesList) {
      if (match.distance < maxGoodMatchDist) {
        goodReferencePointsList.add(
          referenceKeypointsList.get(match.trainIdx).pt);
        goodScenePointsList.add(
          sceneKeypointsList.get(match.queryIdx).pt);
      }
    }

    if (goodReferencePointsList.size() < 4 ||
        goodScenePointsList.size() < 4) {
      // There are too few good points to find the homography.
      return;
    }

    // There are enough good points to find the homography.
    // (Otherwise, the method would have already returned.)

    // Convert the matched points to MatOfPoint2f format, as
    // required by the Calib3d.findHomography function.
    MatOfPoint2f goodReferencePoints = new MatOfPoint2f();
    goodReferencePoints.fromList(goodReferencePointsList);
    MatOfPoint2f goodScenePoints = new MatOfPoint2f();
    goodScenePoints.fromList(goodScenePointsList);

    // Find the homography.
    Mat homography = Calib3d.findHomography(
      goodReferencePoints, goodScenePoints);

    // Use the homography to project the reference corner
    // coordinates into scene coordinates.
    Core.perspectiveTransform(mReferenceCorners,
      mCandidateSceneCorners, homography);

    // Convert the scene corners to integer format, as required
    // by the Imgproc.isContourConvex function.
    mCandidateSceneCorners.convertTo(mIntSceneCorners,
      CvType.CV_32S);

    // Check whether the corners form a convex polygon. If not,
    // (that is, if the corners form a concave polygon), the
    // detection result is invalid because no real perspective can
    // make the corners of a rectangular image look like a concave
    // polygon!
    if (Imgproc.isContourConvex(mIntSceneCorners)) {
      // The corners form a convex polygon, so record them as
      // valid scene corners.
      mCandidateSceneCorners.copyTo(mSceneCorners);
    }
  }
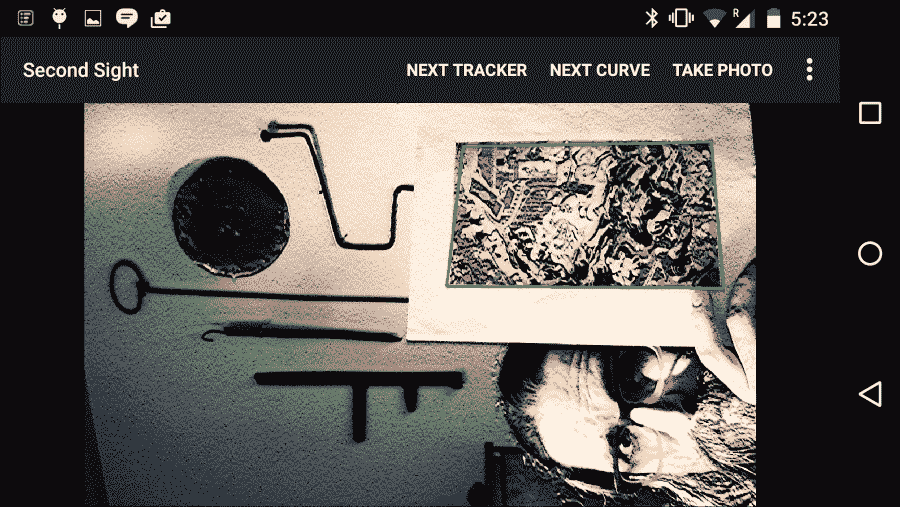
我们的另一个帮助器方法draw(Mat src, Mat dst)首先将源图像复制到目标位置。 然后,如果未跟踪目标,则在图像的一角绘制一个缩略图,以便用户知道要查找的内容。 如果正在追踪目标,我们会在其周围绘制轮廓。 以下一对屏幕快照显示了draw方法的结果,当未跟踪目标(左侧)时和在跟踪目标(右侧)时:
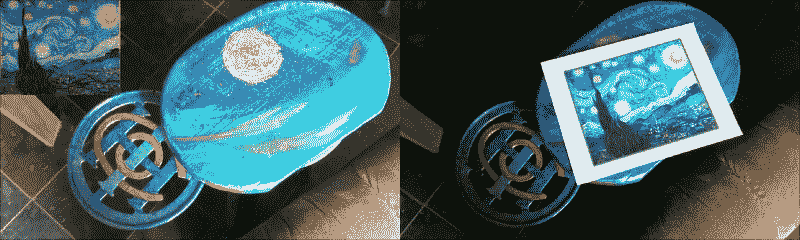
以下代码实现draw帮助器方法:
  protected void draw(Mat src, Mat dst) {

    if (dst != src) {
      src.copyTo(dst);
    }

    if (mSceneCorners.height() < 4) {
      // The target has not been found.

      // Draw a thumbnail of the target in the upper-left
      // corner so that the user knows what it is.

      // Compute the thumbnail's larger dimension as half the
      // video frame's smaller dimension.
      int height = mReferenceImage.height();
      int width = mReferenceImage.width();
      int maxDimension = Math.min(dst.width(),
        dst.height()) / 2;
      double aspectRatio = width / (double)height;
      if (height > width) {
        height = maxDimension;
        width = (int)(height * aspectRatio);
      } else {
        width = maxDimension;
        height = (int)(width / aspectRatio);
      }

      // Select the region of interest (ROI) where the thumbnail
      // will be drawn.
      Mat dstROI = dst.submat(0, height, 0, width);
      // Copy a resized reference image into the ROI.
      Imgproc.resize(mReferenceImage, dstROI, dstROI.size(),
        0.0, 0.0, Imgproc.INTER_AREA);

      return;
    }

    // Outline the found target in green.
    Imgproc.line(dst, new Point(mSceneCorners.get(0, 0)),
      new Point(mSceneCorners.get(1, 0)), mLineColor, 4);
    Imgproc.line(dst, new Point(mSceneCorners.get(1, 0)),
      new Point(mSceneCorners.get(2, 0)), mLineColor, 4);
    Imgproc.line(dst, new Point(mSceneCorners.get(2, 0)),
      new Point(mSceneCorners.get(3, 0)), mLineColor, 4);
    Imgproc.line(dst, new Point(mSceneCorners.get(3,0)),
      new Point(mSceneCorners.get(0, 0)), mLineColor, 4);
  }
}
提示
使代码适配 OpenCV 2.x
将Imgproc.line替换为Core.line。
尽管ImageDetectionFilter的实现比我们以前的过滤器更复杂,但它仍然具有简单的接口。 您必须使用可绘制资源实例化它,然后根据需要将过滤器应用于源图像和目标图像。
将跟踪器过滤器添加到CameraActivity
为了使用ImageDetectionFilter的实例,我们对CameraActivity进行了与上一章中其他过滤器相同的修改。 回想一下,我们所有的过滤器类都实现了Filter接口,以便CameraActivity可以类似的方式使用它们。
首先,我们需要在res/values/strings.xml中定义一些文本(用于菜单按钮):
  <string name="menu_next_image_detection_filter">Next
    Tracker</string>
接下来,我们需要在res/menu/activity_camera.xml中定义菜单按钮本身:
<menu xmlns:android="http://schemas.android.com/apk/res/android"
  xmlns:app="http://schemas.android.com/apk/res-auto">
  <item
    android:id="@+id/menu_next_image_detection_filter"
    app:showAsAction="ifRoom|withText"
    android:title="@string/menu_next_image_detection_filter" />
  <!-- ... -->
</menu>
我们的其余修改都与CameraActivity.java有关。 我们需要添加新的成员变量来跟踪所选的图像检测过滤器:
  // Keys for storing the indices of the active filters.
  private static final String STATE_IMAGE_DETECTION_FILTER_INDEX =
    "imageDetectionFilterIndex";
  private static final String STATE_CURVE_FILTER_INDEX =
    "curveFilterIndex";
  private static final String STATE_MIXER_FILTER_INDEX =
    "mixerFilterIndex";
  private static final String STATE_CONVOLUTION_FILTER_INDEX =
    "convolutionFilterIndex";

  // The filters.
  private Filter[] mImageDetectionFilters;
  private Filter[] mCurveFilters;
  private Filter[] mMixerFilters;
  private Filter[] mConvolutionFilters;

  // The indices of the active filters.
  private int mImageDetectionFilterIndex;
  private int mCurveFilterIndex;
  private int mMixerFilterIndex;
  private int mConvolutionFilterIndex;
初始化 OpenCV 之后,我们需要实例化所有图像检测过滤器并将它们放置在数组中。 为简便起见,我添加了两个图像检测过滤器作为示例,但您可以轻松修改以下代码以支持跟踪更多图像或不同图像:
    public void onManagerConnected(final int status) {
      switch (status) {
        case LoaderCallbackInterface.SUCCESS:
          Log.d(TAG, "OpenCV loaded successfully");
          mCameraView.enableView();
          mBgr = new Mat();

          final Filter starryNight;
          try {
            starryNight = new ImageDetectionFilter(
              CameraActivity.this,
              R.drawable.starry_night);
          } catch (IOException e) {
            Log.e(TAG, "Failed to load drawable: " +
              "starry_night");
            e.printStackTrace();
            break;
          }

         final Filter akbarHunting;
         try {
           akbarHunting = new ImageDetectionFilter(
             CameraActivity.this,
             R.drawable.akbar_hunting_with_cheetahs);
         } catch (IOException e) {
           Log.e(TAG, "Failed to load drawable: " +
             "akbar_hunting_with_cheetahs");
           e.printStackTrace();
           break;
         }

          mImageDetectionFilters = new Filter[] {
            new NoneFilter(),
            starryNight,
            akbarHunting
          };

          // ...
      }
    }
  };
创建活动后,我们需要加载有关所选图像检测过滤器的所有已保存数据:
  protected void onCreate(final Bundle savedInstanceState) {
    super.onCreate(savedInstanceState);

    final Window window = getWindow();
    window.addFlags(
      WindowManager.LayoutParams.FLAG_KEEP_SCREEN_ON);

    if (savedInstanceState != null) {
      mCameraIndex = savedInstanceState.getInt(
        STATE_CAMERA_INDEX, 0);
      mImageSizeIndex = savedInstanceState.getInt(
        STATE_IMAGE_SIZE_INDEX, 0);
 mImageDetectionFilterIndex =
 savedInstanceState.getInt(
 STATE_IMAGE_DETECTION_FILTER_INDEX, 0);
      mCurveFilterIndex = savedInstanceState.getInt(
        STATE_CURVE_FILTER_INDEX, 0);
      mMixerFilterIndex = savedInstanceState.getInt(
        STATE_MIXER_FILTER_INDEX, 0);
      mConvolutionFilterIndex = savedInstanceState.getInt(
        STATE_CONVOLUTION_FILTER_INDEX, 0);
    } else {
      mCameraIndex = 0;
      mImageSizeIndex = 0;
      mImageDetectionFilterIndex = 0;
      mCurveFilterIndex = 0;
      mMixerFilterIndex = 0;
      mConvolutionFilterIndex = 0;
    }

    // ...
  }
相反,在活动被销毁之前,我们需要保存有关所选图像检测过滤器的数据:
  public void onSaveInstanceState(Bundle savedInstanceState) {
    // Save the current camera index.
    savedInstanceState.putInt(STATE_CAMERA_INDEX, mCameraIndex);

    // Save the current image size index.
    savedInstanceState.putInt(STATE_IMAGE_SIZE_INDEX,
      mImageSizeIndex);

    // Save the current filter indices.
    savedInstanceState.putInt(STATE_IMAGE_DETECTION_FILTER_INDEX,
      mImageDetectionFilterIndex);
    savedInstanceState.putInt(STATE_CURVE_FILTER_INDEX,
      mCurveFilterIndex);
    savedInstanceState.putInt(STATE_MIXER_FILTER_INDEX,
      mMixerFilterIndex);
    savedInstanceState.putInt(STATE_CONVOLUTION_FILTER_INDEX,
      mConvolutionFilterIndex);

    super.onSaveInstanceState(savedInstanceState);
  }
当按下下个跟踪器菜单按钮时,需要更新所选图像检测过滤器:
  public boolean onOptionsItemSelected(final MenuItem item) {
    if (mIsMenuLocked) {
      return true;
    }
    if (item.getGroupId() == MENU_GROUP_ID_SIZE) {
      mImageSizeIndex = item.getItemId();
      recreate();
      return true;
    }
    switch (item.getItemId()) {
    case R.id.menu_next_image_detection_filter:
      mImageDetectionFilterIndex++;
      if (mImageDetectionFilterIndex ==
        mImageDetectionFilters.length) {
        mImageDetectionFilterIndex = 0;
      }
      return true;
    // ...
    default:
      return super.onOptionsItemSelected(item);
    }
  }
最后,当相机捕获一帧时,需要将选定的图像检测过滤器应用于该帧。 为了确保其他过滤器不会干扰图像检测,重要的是首先应用图像检测过滤器:
  public Mat onCameraFrame(final CvCameraViewFrame inputFrame) {
    final Mat rgba = inputFrame.rgba();

    // Apply the active filters.
    if (mImageDetectionFilters != null) {
      mImageDetectionFilters[mImageDetectionFilterIndex].apply(
        rgba, rgba);
    }
    if (mCurveFilters != null) {
      mCurveFilters[mCurveFilterIndex].apply(rgba, rgba);
    }
    if (mMixerFilters != null) {
      mMixerFilters[mMixerFilterIndex].apply(rgba, rgba);
    }
    if (mConvolutionFilters != null) {
      mConvolutionFilters[mConvolutionFilterIndex].apply(
        rgba, rgba);
    }

    if (mIsPhotoPending) {
      mIsPhotoPending = false;
      takePhoto(rgba);
    }

    if (mIsCameraFrontFacing) {
      // Mirror (horizontally flip) the preview.
      Core.flip(rgba, rgba, 1);
    }

    return rgba;
  }
就这样! 打印目标图像或在屏幕上显示它们。 然后,运行应用,选择合适的图像检测过滤器,然后将相机对准目标。 如果视频太不稳定(由于图像处理缓慢),请选择较低的相机分辨率,然后重试。 另外,您可能需要将 Android 设备保持一两秒钟的静止不动,以使相机自动对焦在目标上。 然后,您应该看到目标以绿色概述。 例如,请参见以下屏幕快照中的《星空》周围的轮廓:
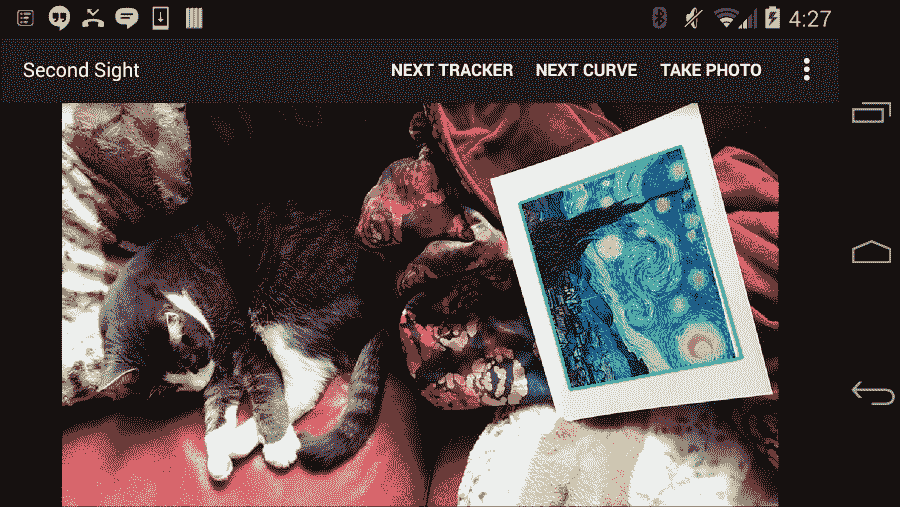
请注意,即使目标图像旋转或倾斜,图像检测过滤器也可以工作。 现在,尝试将图像检测过滤器与其他过滤器组合使用。 因为我们在其他过滤之前执行图像检测,所以目标图像在检测器中看起来仍然相同,应该被检测到。 例如,在以下屏幕截图中,请注意,即使RecolorRGVFilter,CrossProcessCurveFilter和StrokeEdgesFilter也正在运行时,也会检测到《阿克巴猎豹》(并用绿色框出):
总结
Second Sight 应用现在可以看到! 至少,它可以识别预定义集中的任何图像,并在该图像周围绘制四边形。 在某种程度上,此功能在缩放,旋转和倾斜方面都非常强大。 例如,可以在各种放大率,分辨率,距离和视角下跟踪图像。
尽管在本章中仅添加了一个类,但我们介绍了许多 OpenCV 功能。 接下来,我们将退后一步,考虑如何将该 OpenCV 功能与其他类型的图形进行集成,这些图形将实时响应摄像机的输入。 我们将在 Second Sight 的图像识别过滤器上构建一个小的 3D 渲染场景。
