三、处理文件和图像
在任何类型的项目中,处理文件和图像都是关键。 从这个意义上讲,许多项目都应将文件作为数据输入形式来使用。 此外,项目可以在完成任何类型的处理后生成一些数据,这些数据可以以文件或图像的形式输出。 在计算机视觉中,由于这些类型的项目的固有特征(例如,要处理的图像和由机器学习算法生成的模型),这种信息流(输入-处理-输出)具有特殊的意义。
在本章中,我们将看到如何处理文件和图像。 您将学习如何处理构建计算机视觉应用所必需的文件和图像。
更具体地说,我们将涵盖以下主题:
- 有关处理文件和图像的理论介绍
- 读/写图像
- 读取相机帧和视频文件
- 写入视频文件
- 玩转视频捕获属性
技术要求
本章的技术要求如下:
- Python 和 OpenCV
- 特定于 Python 的 IDE
- NumPy 和 Matplotlib Python 包
- Git 客户端
可以在这个页面上访问使用 Python 精通 OpenCV 的 GitHub 存储库。
处理文件和图像的简介
在深入处理文件和图像之前,我们将为您提供本章将要介绍的内容的概述。 下图概述了此概述:
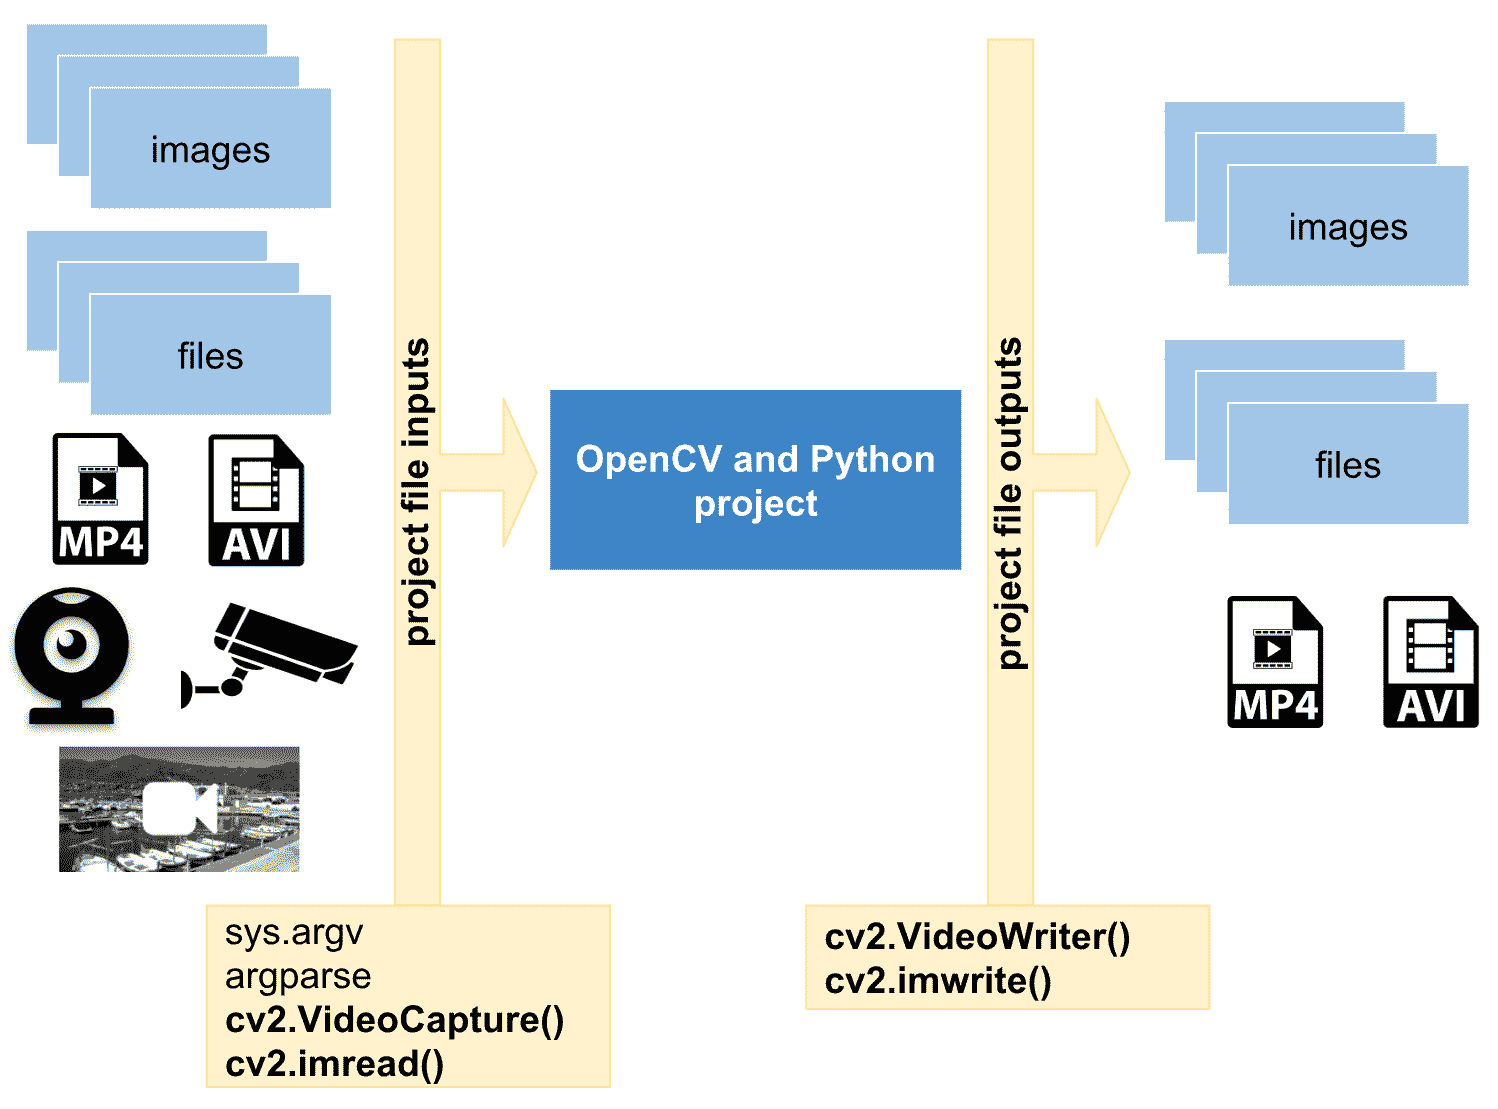
在上图中,您可以看到计算机视觉项目(例如 OpenCV 和 Python 项目)应处理一些输入文件(例如文件和图片)。 另外,经过一些处理后,项目可以输出一些文件(例如图像和文件)。 因此,在本章中,我们将了解如何满足这些要求以及如何正确实现此流程(输入-处理-输出)。
执行程序的首要步骤是正确处理命令行参数,命令行参数是提供给包含某种参数化信息的程序或脚本的参数。 例如,如果编写脚本以将两个数字相加,则通常的方法是具有两个参数,这是执行加法所必需的两个数字。 在计算机视觉项目中,图像和不同类型的文件通常作为命令行参数传递给脚本。
命令行参数是参数化程序执行的常用且简单的方法。
sys.argv
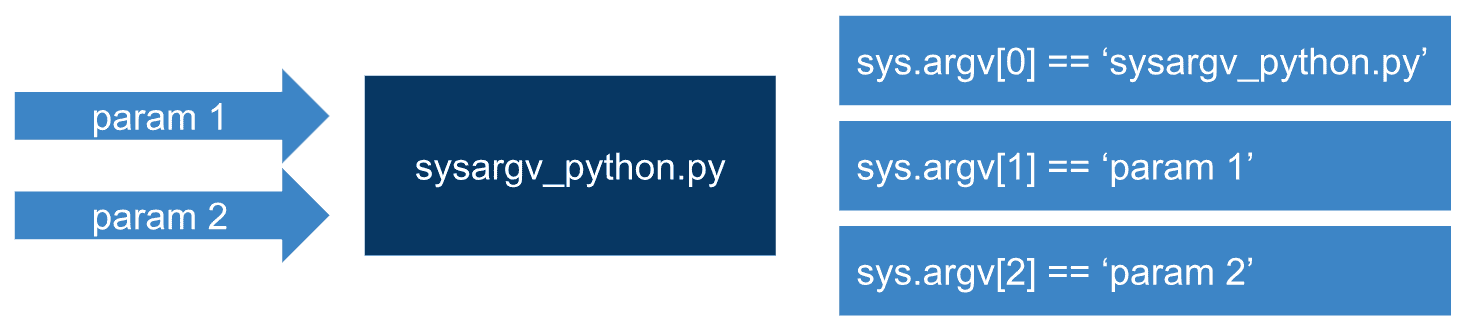
为了处理命令行参数,Python 使用sys.argv。 从这种意义上讲,执行程序时,Python 从命令行获取所有值并将其设置在sys.argv列表中。 列表的第一个元素是脚本的完整路径(或脚本名称-取决于操作系统),该路径始终为sys.argv[0]。 列表的第二个元素是脚本的第一个参数,即sys.argv[1],依此类推。 可以在下图中看到,其中sysargv_python.py脚本使用两个参数执行:
要查看sys.argv的工作方式,我们将使用sysargv_python.py脚本:
# Import the required packages
import sys

# We will print some information in connection with sys.argv to see how it works:
print("The name of the script being processed is: '{}'".format(sys.argv[0]))
print("The number of arguments of the script is: '{}'".format(len(sys.argv)))
print("The arguments of the script are: '{}'".format(str(sys.argv)))
如果执行此脚本时不带任何参数,则将看到以下信息:
The name of the script being processed is: 'sysargv_python.py'
The number of arguments of the script is: '1'
The arguments of the script are: '['sysargv_python.py']'
另外,如果我们使用一个参数(例如sysargv_python.py OpenCV)执行此脚本,我们将获得以下信息:
The name of the script being processed is: 'sysargv_python.py'
The number of arguments of the script is: '2'
The arguments of the script are: '['sysargv_python.py', 'OpenCV']'
如您所见,列表的第一个元素sysargv_python.py(sys.argv[0])是脚本名称。 列表(sys.argv[1])中的第二个元素OpenCV是脚本的第一个参数。
argv[0]是脚本名,如果它不是完整路径名,则取决于操作系统。 请参阅这里了解更多信息。
argparse – 命令行选项和参数解析
应该考虑到,我们不应该直接处理sys.argv,主要是当我们的程序采用复杂的参数或多个文件名时。 另外,我们应该使用 Python 的argparse库,该库以系统的方式处理命令行参数,从而使其可以编写用户友好的命令行程序。 换句话说,Python 在标准库中有一个名为argparse的模块,用于解析命令行参数。 首先,程序确定所需的参数。 然后,argparse将研究如何将这些参数解析为sys.argv。 同样,argparse会生成帮助和使用消息,并在提供无效参数时发出错误。
此处介绍此模块的最小示例为argparse_minimal.py,如下所示:
# Import the required packages
import argparse

# We first create the ArgumentParser object
# The created object 'parser' will have the necessary information
# to parse the command-line arguments into data types.
parser = argparse.ArgumentParser()

# The information about program arguments is stored in 'parser' and used when parse_args() is called.
# ArgumentParser parses arguments through the parse_args() method:
parser.parse_args()
不带参数运行此脚本将不会显示任何内容给stdout。 但是,如果包含--help(或-h)选项,我们将获得脚本的用法消息:
usage: argparse_minimal.py [-h]
optional arguments:
-h, --help show this help message and exit
指定其他任何参数都会导致错误,例如:
argparse_minimal.py 6
usage: argparse_minimal.py [-h]
argparse_minimal.py: error: unrecognized arguments: 6
因此,我们必须使用-h参数调用此脚本。 这样,将显示使用消息信息。 由于未定义任何参数,因此不允许其他可能性。 这样,引入argparse的第二个示例是添加一个参数,可以在argparse_positional_arguments.py的示例中看到:
# Import the required packages
import argparse

# We first create the ArgumentParser object
# The created object 'parser' will have the necessary information
# to parse the command-line arguments into data types.
parser = argparse.ArgumentParser()

# We add a positional argument using add_argument() including a help
parser.add_argument("first_argument", help="this is the string text in connection with first_argument")

# The information about program arguments is stored in 'parser'
# Then, it is used when the parser calls parse_args().
# ArgumentParser parses arguments through the parse_args() method:
args = parser.parse_args()

# We get and print the first argument of this script:
print(args.first_argument)
我们添加了add_argument()方法。 此方法用于指定程序将接受的命令行选项。 在这种情况下,需要first_argument参数。 另外,argparse模块存储所有参数,使其名称与每个添加的参数的名称(在本例中为first_argument)匹配。 因此,为了获得我们的参数,我们执行args.first_argument。
如果此脚本以argparse_positional_arguments.py 5的身份执行,则输出将为5。 但是,如果脚本不带参数argparse_positional_arguments.py来执行,则输出如下:
usage: argparse_positional_arguments.py [-h] first_argument
argparse_positional_arguments.py: error: the following arguments are required: first_argument
最后,如果我们使用-h选项执行脚本,输出将如下所示:
usage: argparse_positional_arguments.py [-h] first_argument
positional arguments:
 first_argument this is the string text in connection with first_argument
optional arguments:
 -h, --help show this help message and exit
默认情况下,argparse将我们提供的选项视为字符串。 因此,如果参数不是字符串,则应建立type选项。 我们将看到argparse_sum_two_numbers.py脚本添加了两个参数,因此,这两个参数属于int类型:
# Import the required packages
import argparse

# We first create the ArgumentParser object
# The created object 'parser' will have the necessary information
# to parse the command-line arguments into data types.
parser = argparse.ArgumentParser()

# We add 'first_number' argument using add_argument() including a help. The type of this argument is int
parser.add_argument("first_number", help="first number to be added", type=int)

# We add 'second_number' argument using add_argument() including a help The type of this argument is int
parser.add_argument("second_number", help="second number to be added", type=int)

# The information about program arguments is stored in 'parser'
# Then, it is used when the parser calls parse_args().
# ArgumentParser parses arguments through the parse_args() method:
args = parser.parse_args()
print("args: '{}'".format(args))

print("the sum is: '{}'".format(args.first_number + args.second_number))

# Additionally, the arguments can be stored in a dictionary calling vars() function:
args_dict = vars(parser.parse_args())

# We print this dictionary:
print("args_dict dictionary: '{}'".format(args_dict))

# For example, to get the first argument using this dictionary:
print("first argument from the dictionary: '{}'".format(args_dict["first_number"]))
如果在不带参数的情况下执行脚本,则输出将如下所示:
argparse_sum_two_numbers.py
usage: argparse_sum_two_numbers.py [-h] first_number second_number
argparse_sum_two_numbers.py: error: the following arguments are required: first_number, second_number
另外,如果我们使用-h选项执行脚本,则输出将如下所示:
argparse_sum_two_numbers.py --help
usage: argparse_sum_two_numbers.py [-h] first_number second_number

positional arguments:
 first_number first number to be added
 second_number second number to be added

optional arguments:
 -h, --help show this help message and exit
应该考虑到,在前面的示例中,我们通过调用vars()函数引入了将参数存储在字典中的可能性:
# Additionally, the arguments can be stored in a dictionary calling vars() function:
args_dict = vars(parser.parse_args())

# We print this dictionary:
print("args_dict dictionary: '{}'".format(args_dict))

# For example, to get the first argument using this dictionary:
print("first argument from the dictionary: '{}'".format(args_dict["first_number"]))
例如,如果此脚本以argparse_sum_two_numbers.py 5 10执行,则输出将如下所示:
args: 'Namespace(first_number=5, second_number=10)'
the sum is: '15'
args_dict dictionary: '{'first_number': 5, 'second_number': 10}'
first argument from the dictionary: '5'
这是对sys.argv和argparse的快速介绍。 可以在这个页面上看到argparse的高级介绍。 此外,其文档非常详细,细致,并涵盖了许多示例。 此时,您现在可以在 OpenCV 和 Python 程序中学习如何使用argparse读取和写入图像,这将在“读取和写入图像”部分中显示。
读写图像
在计算机视觉项目中,图像通常在脚本中用作命令行参数。 在以下各节中,我们将看到如何读取和写入图像。
在 OpenCV 中读取图像
以下示例argparse_load_image.py展示了如何加载图像:
# Import the required packages
import argparse
import cv2

# We first create the ArgumentParser object
# The created object 'parser' will have the necessary information
# to parse the command-line arguments into data types.
parser = argparse.ArgumentParser()

# We add 'path_image' argument using add_argument() including a help. The type of this argument is string (by default)
parser.add_argument("path_image", help="path to input image to be displayed")

# The information about program arguments is stored in 'parser'
# Then, it is used when the parser calls parse_args().
# ArgumentParser parses arguments through the parse_args() method:
args = parser.parse_args()

# We can now load the input image from disk:
image = cv2.imread(args.path_image)

# Parse the argument and store it in a dictionary:
args = vars(parser.parse_args())

# Now, we can also load the input image from disk using args:
image2 = cv2.imread(args["path_image"])

# Show the loaded image:
cv2.imshow("loaded image", image)
cv2.imshow("loaded image2", image2)

# Wait until a key is pressed:
cv2.waitKey(0)

# Destroy all windows:
cv2.destroyAllWindows()
在此示例中,必需的参数为path_image,其中包含我们要加载的图像的路径。 图像的路径是一个字符串。 因此,位置参数中不应包含任何类型,因为默认情况下它是字符串。 args.path_image和args["path_image"]都将包含图像的路径(从参数获取值的两种不同方式),因此我们将它们用作cv2.imread()函数的参数。
在 OpenCV 中读取和写入图像
一种常见的方法是加载图像,执行某种处理,然后最终输出处理后的图像(请参阅第 2 章, OpenCV 中的图像基础知识,这三部分的详细说明) 脚步)。 从这个意义上讲,可以将处理后的图像保存到磁盘。 在以下示例中,介绍了这三个步骤(加载,处理和保存)。 在这种情况下,处理步骤非常简单(将图像转换为灰度)。 在以下示例argparse_load_processing_save_image.py中可以看到:
# Import the required packages
import argparse
import cv2

# We first create the ArgumentParser object
# The created object 'parser' will have the necessary information
# to parse the command-line arguments into data types.
parser = argparse.ArgumentParser()

# Add 'path_image_input' argument using add_argument() including a help. The type is string (by default):
parser.add_argument("path_image_input", help="path to input image to be displayed")

# Add 'path_image_output' argument using add_argument() including a help. The type is string (by default):
parser.add_argument("path_image_output", help="path of the processed image to be saved")

# Parse the argument and store it in a dictionary:
args = vars(parser.parse_args())

# We can load the input image from disk:
image_input = cv2.imread(args["path_image_input"])

# Show the loaded image:
cv2.imshow("loaded image", image_input)

# Process the input image (convert it to grayscale):
gray_image = cv2.cvtColor(image_input, cv2.COLOR_BGR2GRAY)

# Show the processed image:
cv2.imshow("gray image", gray_image)

# Save the processed image to disk:
cv2.imwrite(args["path_image_output"], gray_image)

# Wait until a key is pressed:
cv2.waitKey(0)

# Destroy all windows:
cv2.destroyAllWindows()
在前面的示例中,有两个必需的参数。 第一个是path_image_input,它包含我们要加载的图像的路径。 图像的路径是一个字符串。 因此,位置参数中不应包含任何类型,因为默认情况下它是字符串。 第二个是path_image_output,它包含我们要保存的结果图像的路径。 在此示例中,处理步骤包括将加载的图像转换为灰度:
# Process the input image (convert it to grayscale)
gray_image = cv2.cvtColor(image_input, cv2.COLOR_BGR2GRAY)
应当注意,第二个参数cv2.COLOR_BGR2GRAY假定加载的图像是 BGR 彩色图像。 如果您已加载 RGB 彩色图像,并且想要将其转换为灰度,则应使用cv2.COLOR_RGB2GRAY。
这是一个非常简单的处理步骤,但为简单起见将其包括在内。 在以后的章节中,将显示更详细的处理算法。
读取相机帧和视频文件
在某些项目中,您必须捕获相机帧(例如,使用笔记本电脑的网络摄像头捕获的帧)。 在 OpenCV 中,我们具有cv2.VideoCapture,该类用于从不同来源(例如图像序列,视频文件和相机)捕获视频。 在本节中,我们将看到一些示例,向我们介绍此类用于捕获相机帧的类。
读取相机帧
第一个示例read_camera.py向您展示如何从连接到计算机的相机读取帧。 必需的参数为index_camera,它指示要读取的摄像机的索引。 如果已将网络摄像头连接到计算机,则其索引为0。 另外,如果您有第二台摄像机,则可以通过1进行选择。 如您所见,此参数的类型为int。
使用cv2.VideoCapture的第一步是创建一个要使用的对象。 在这种情况下,对象是capture,我们这样调用构造器:
 # We create a VideoCapture object to read from the camera (pass 0):
capture = cv2.VideoCapture(args.index_camera)
如果index_camera是0(您的第一个连接的摄像机),则它等效于cv2.VideoCapture(0)。 为了检查连接是否正确建立,我们使用capture.isOpened()方法,如果无法建立连接,则返回False。 同样,如果捕获已正确初始化,则此方法返回True。
要从摄像机逐帧捕获素材,我们调用capture.read()方法,该方法从摄像机返回帧。 该框架与 OpenCV 中的图像具有相同的结构,因此我们可以以相同的方式使用它。 例如,要将帧转换为灰度,请执行以下操作:
gray_frame = cv2.cvtColor(frame, cv2.COLOR_BGR2GRAY)
此外,capture.read()返回布尔值。 该布尔值指示是否已从捕获对象正确读取帧。
访问捕获对象的某些属性
最后,您可以使用capture.get(property_identifier)访问捕获对象的某些属性。 在这种情况下,我们获得一些属性,例如帧宽度,帧高度和每秒帧(fps)。 如果我们调用不支持的属性,则返回值为0:
# Import the required packages
import cv2
import argparse

# We first create the ArgumentParser object
# The created object 'parser' will have the necessary information
# to parse the command-line arguments into data types.
parser = argparse.ArgumentParser()

# We add 'index_camera' argument using add_argument() including a help.
parser.add_argument("index_camera", help="index of the camera to read from", type=int)
args = parser.parse_args()

# We create a VideoCapture object to read from the camera (pass 0):
capture = cv2.VideoCapture(args.index_camera)

# Get some properties of VideoCapture (frame width, frame height and frames per second (fps)):
frame_width = capture.get(cv2.CAP_PROP_FRAME_WIDTH)
frame_height = capture.get(cv2.CAP_PROP_FRAME_HEIGHT)
fps = capture.get(cv2.CAP_PROP_FPS)

# Print these values:
print("CV_CAP_PROP_FRAME_WIDTH: '{}'".format(frame_width))
print("CV_CAP_PROP_FRAME_HEIGHT : '{}'".format(frame_height))
print("CAP_PROP_FPS : '{}'".format(fps))

# Check if camera opened successfully
if capture.isOpened()is False:
    print("Error opening the camera")

# Read until video is completed
while capture.isOpened():
    # Capture frame-by-frame from the camera
    ret, frame = capture.read()

    if ret is True:
        # Display the captured frame:
        cv2.imshow('Input frame from the camera', frame)

        # Convert the frame captured from the camera to grayscale:
        gray_frame = cv2.cvtColor(frame, cv2.COLOR_BGR2GRAY)

        # Display the grayscale frame:
        cv2.imshow('Grayscale input camera', gray_frame)

        # Press q on keyboard to exit the program
        if cv2.waitKey(20) & 0xFF == ord('q'):
            break
    # Break the loop
    else:
        break

# Release everything:
capture.release()
cv2.destroyAllWindows()
保存相机帧
可以很容易地修改前面的示例,以添加有用的功能。 假设您想在发生一些有趣的事情时将一些帧保存到磁盘。 在下面的示例read_camera_capture.py中,我们将添加此功能。 当按下键盘上的C键时,我们将当前帧保存到磁盘。 我们同时保存了 BGR 和灰度帧。 执行此功能的代码如下所示:
 # Press c on keyboard to save current frame
 if cv2.waitKey(20) & 0xFF == ord('c'):
     frame_name = "camera_frame_{}.png".format(frame_index)
     gray_frame_name = "grayscale_camera_frame_{}.png".format(frame_index)
     cv2.imwrite(frame_name, frame)
     cv2.imwrite(gray_frame_name, gray_frame)
     frame_index += 1
ord('c')使用八位返回代表c字符的值。 此外,cv2.waitKey()值是按位的,并且将&运算符与0xFF一起使用只能得到其最后八位。 因此,我们可以在这两个 8 位值之间进行比较。 当按下C键时,我们为两个帧建立名称。 然后,我们将两个图像保存到磁盘。 最后,增加frame_index,以便为保存下一帧做好准备。 请查看read_camera_capture.py以查看此脚本的完整代码。
读取视频文件
cv2.VideoCapture也允许我们阅读视频文件。 因此,要读取视频文件,在创建cv2.VideoCapture对象时应提供视频文件的路径:
# We first create the ArgumentParser object
# The created object 'parser' will have the necessary information
# to parse the command-line arguments into data types.
parser = argparse.ArgumentParser()

# We add 'video_path' argument using add_argument() including a help.
parser.add_argument("video_path", help="path to the video file")
args = parser.parse_args()

# Create a VideoCapture object. In this case, the argument is the video file name:
capture = cv2.VideoCapture(args.video_path)
请查看read_video_file.py,以查看如何使用cv2.VideoCapture读取和显示视频文件的完整示例。
从 IP 摄像机读取
为了完成cv2.VideoCapture,我们将看看如何从 IP 摄像机读取数据。 从 OpenCV 中的 IP 摄像机读取与从文件读取非常相似。 从这个意义上讲,仅应更改cv2.VideoCapture构造器的参数。 这样做的好处是,您无需在本地网络中使用 IP 摄像机即可尝试此功能。 您可以尝试连接许多公共 IP 摄像机。 例如,我们要连接到公共 IP 摄像机,该摄像机位于俱乐部 Näutic 德拉塞尔瓦港–布拉瓦海岸–克雷乌斯角(西班牙赫罗纳)。 该端口的网页位于这个页面上。 您可以导航到网络摄像头部分以找到一些要连接的网络摄像头。
因此,您唯一需要修改的就是cv2.VideCapture的参数。 在这种情况下,它是http://217.126.89.102:8010/axis-cgi/mjpg/video.cgi。 如果执行此示例(read_ip_camera.py),应该会看到类似于以下屏幕截图的内容,其中显示了从 IP 摄像机获得的 BGR 和灰度图像:

写入视频文件
在本节中,我们将看到如何使用cv2.VideoWriter写入视频文件。 但是,应首先介绍一些概念(例如 fps,编解码器和视频文件格式)。
计算每秒帧
在“读取摄像机帧和视频文件”部分中,我们看到了如何从cv2.VideoCapture对象获得一些属性。 fps 是计算机视觉项目中的重要指标。 该度量指示每秒处理多少帧。 可以肯定地说,较高的 fps 更好。 但是,算法每秒应处理的帧数取决于您要解决的特定问题。 例如,如果您的算法应跟踪并检测沿着街道行走的人,则 15 fps 可能就足够了。 但是,如果您的目标是检测和跟踪高速公路上快速行驶的汽车,则可能需要 20-25 fps。
因此,了解如何在计算机视觉项目中计算 fps 指标很重要。 在下面的示例read_camera_fps.py中,我们将修改read_camera.py以输出 fps 数。 关键点显示在以下代码中:
# Read until the video is completed, or 'q' is pressed
while capture.isOpened():
    # Capture frame-by-frame from the camera
    ret, frame = capture.read()

    if ret is True:
        # Calculate time before processing the frame:
        processing_start = time.time()

        # All the processing should be included here
        # ...
        # ...
        # End of processing

        # Calculate time after processing the frame
        processing_end = time.time()

        # Calculate the difference
        processing_time_frame = processing_end - processing_start

        # FPS = 1 / time_per_frame
        # Show the number of frames per second
        print("fps: {}".format(1.0 / processing_time_frame))

    # Break the loop
    else:
        break
首先,我们花点时间进行处理:
processing_start = time.time()
然后,我们在所有处理完成之后花时间:
processing_end = time.time()
然后,我们计算出差异:
processing_time_frame = processing_end - processing_start
最后,我们计算并打印 fps 数:
print("fps: {}".format(1.0 / processing_time_frame))
写入视频文件的注意事项
视频代码是一种用于压缩和解压缩数字视频的软件。 因此,编解码器可以用于将未压缩的视频转换为压缩的视频,也可以用于将压缩的视频转换为未压缩的视频。 压缩视频格式通常遵循称为视频压缩规范或视频编码格式的标准规范。 从这个意义上讲,OpenCV 提供了 FOURCC,这是一个 4 字节的代码,用于指定视频编解码器。 FOURCC 代表四个字符的代码。 可以在这个页面上找到所有可用代码的列表。 应该考虑到受支持的编解码器是平台相关的。 这意味着,如果要使用特定的编解码器,则该编解码器应该已经安装在系统上。 典型的编解码器是 DIVX,XVID,X264 和 MJPG。
此外,视频文件格式是一种用于存储数字视频数据的文件格式。 典型的视频文件格式为 AVI(*.avi),MP4(*.mp4),QuickTime(*.mov)和 Windows Media Video(*.wmv)。
最后,应考虑到视频文件格式(例如*.avi)和 FOURCC(例如 DIVX)之间的正确组合并不是简单明了的。 您可能需要尝试并使用这些值。 因此,在 OpenCV 中创建视频文件时,您必须考虑所有这些因素。
下图试图对其进行总结:
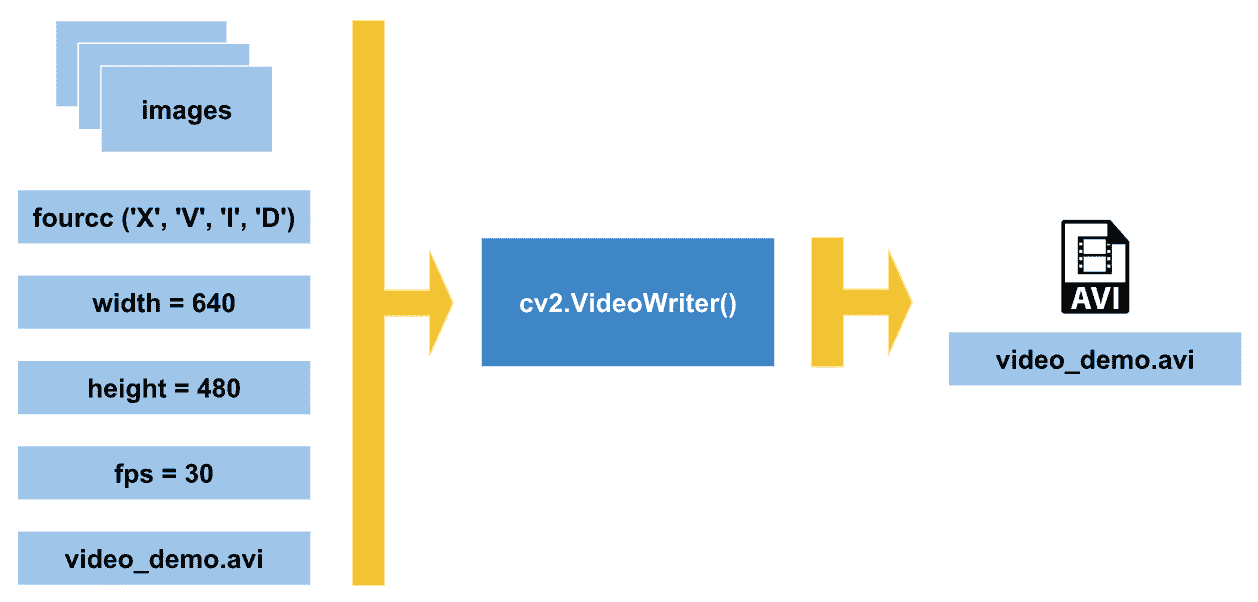
此图总结了在 OpenCV 中使用cv2.VideoWriter()创建视频文件时应考虑的主要注意事项。 在此图中,已创建video_demo.avi视频。 在这种情况下,FOURCC 值为XVID,视频文件格式为AVI(*.avi)。 最后,应确定 fps 和视频每一帧的尺寸。
此外,下面的示例write_video_file.py编写了一个视频文件,使用这些概念也可能会有所帮助。 此示例的一些关键点在此处进行了注解。 在此示例中,必需的参数是视频文件名(例如video_demo.avi):
# We first create the ArgumentParser object
# The created object 'parser' will have the necessary information
# to parse the command-line arguments into data types.
parser = argparse.ArgumentParser()

# We add 'output_video_path' argument using add_argument() including a help.
parser.add_argument("output_video_path", help="path to the video file to write")
args = parser.parse_args()
我们将从连接到计算机的第一台相机拍摄帧。 因此,我们相应地创建对象:
# Create a VideoCapture object and pass 0 as argument to read from the camera
capture = cv2.VideoCapture(0)
接下来,我们将从捕获对象中获取一些属性(帧宽度,帧高度和 fps)。 我们将使用它们来创建我们的视频文件:
# Get some properties of VideoCapture (frame width, frame height and frames per second (fps)):
frame_width = capture.get(cv2.CAP_PROP_FRAME_WIDTH)
frame_height = capture.get(cv2.CAP_PROP_FRAME_HEIGHT)
fps = capture.get(cv2.CAP_PROP_FPS)
现在,我们使用 FOURCC(四字节代码)指定视频编解码器。 请记住,它是依赖于平台的。 在这种情况下,我们将编解码器定义为XVID:
# FourCC is a 4-byte code used to specify the video codec and it is platform dependent!
# In this case, define the codec XVID
fourcc = cv2.VideoWriter_fourcc('X', 'V', 'I', 'D')
以下行也适用:
# FourCC is a 4-byte code used to specify the video codec and it is platform dependent!
# In this case, define the codec XVID
fourcc = cv2.VideoWriter_fourcc(*'XVID')
然后,我们创建cv2.VideoWriter对象out_gray。 我们使用与输入相机相同的属性。 最后一个参数是False,以便我们可以以灰度级编写视频。 如果我们要创建彩色视频,则最后一个参数应为True:
# Create VideoWriter object. We use the same properties as the input camera.
# Last argument is False to write the video in grayscale. True otherwise (write the video in color)
out_gray = cv2.VideoWriter(args.output_video_path, fourcc, int(fps), (int(frame_width), int(frame_height)), False)
我们使用capture.read()从捕获对象逐帧输出。 每帧都将转换为灰度并写入视频文件。 我们可以显示框架,但这不是编写视频所必需的。 如果按q,程序结束:
# Read until video is completed or 'q' is pressed
while capture.isOpened():
    # Read the frame from the camera
    ret, frame = capture.read()
    if ret is True:

        # Convert the frame to grayscale
        gray_frame = cv2.cvtColor(frame, cv2.COLOR_BGR2GRAY)

        # Write the grayscale frame to the video
        out_gray.write(gray_frame)

        # We show the frame (this is not necessary to write the video)
        # But we show it until 'q' is pressed
        cv2.imshow('gray', gray_frame)
        if cv2.waitKey(1) & 0xFF == ord('q'):
            break
    else:
        break
最后,我们释放所有内容(cv2.VideoCapture和cv2.VideWriter对象,并销毁创建的窗口):
# Release everything:
capture.release()
out_gray.release()
cv2.destroyAllWindows()
该示例的完整代码可以在write_video_file.py文件中看到。
玩转视频捕获属性
在前面的一些示例中,我们看到了如何从cv2.VideoCapture对象获取某些属性。 在本节中,我们将看到如何获取所有属性并了解它们如何工作。 最后,我们将使用这些属性来加载视频文件并向后输出(首先显示视频的最后一帧,依此类推)。
从视频捕获对象获取所有属性
首先,我们创建read_video_file_all_properties.py脚本以显示所有属性。 其中一些属性仅在我们使用相机(不适用于视频文件)时才起作用。 在这些情况下,将返回0值。 此外,我们创建了decode_fourcc()函数,该函数将capture.get(cv2.CAP_PROP_FOURCC)返回的值转换为包含编解码器的int表示形式的字符串值。 从这个意义上讲,此值应转换为四字节的char表示形式,以正确输出编解码器。 因此,decode_fourcc()函数可以解决此问题。
该函数的代码如下:
def decode_fourcc(fourcc):
    """Decodes the fourcc value to get the four chars identifying it

    """
    fourcc_int = int(fourcc)

    # We print the int value of fourcc
    print("int value of fourcc: '{}'".format(fourcc_int))

    # We can also perform this in one line:
    # return "".join([chr((fourcc_int >> 8 * i) & 0xFF) for i in range(4)])

    fourcc_decode = ""
    for i in range(4):
        int_value = fourcc_int >> 8 * i & 0xFF
        print("int_value: '{}'".format(int_value))
        fourcc_decode += chr(int_value)
    return fourcc_decode
为了说明其工作原理,下图总结了主要步骤:
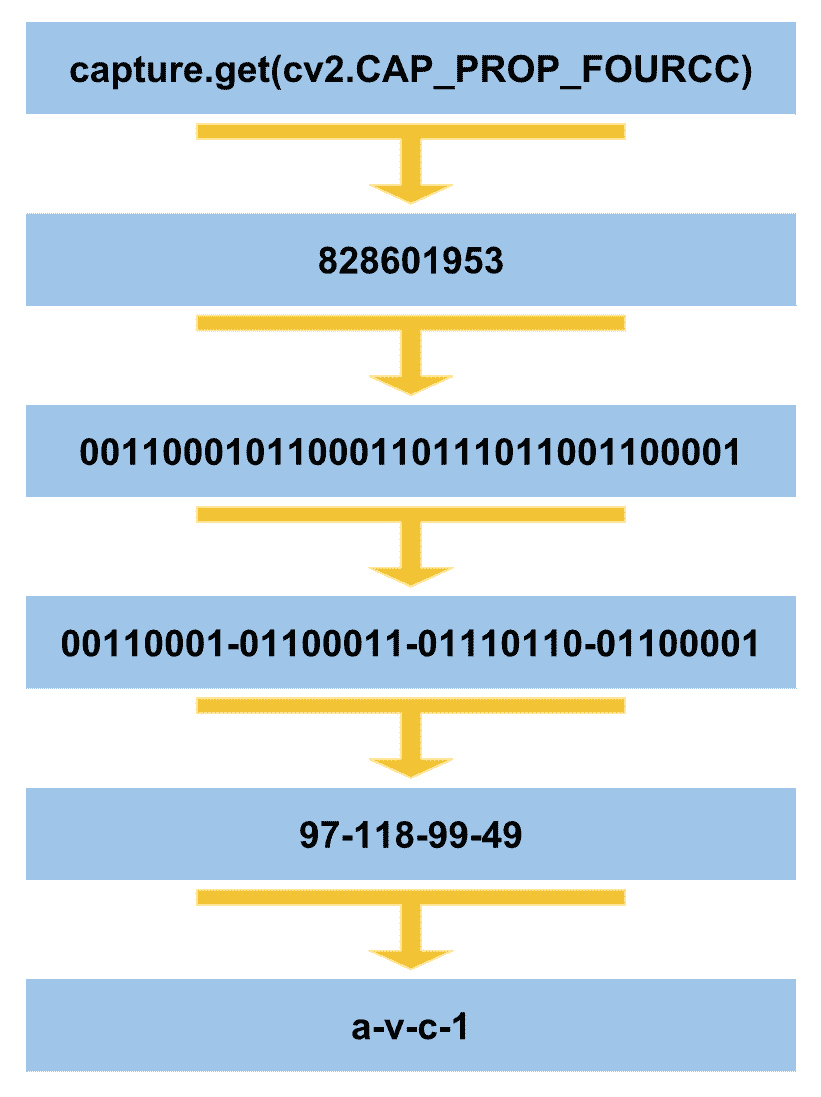
如您所见,第一步是获取capture.get(cv2.CAP_PROP_FOURCC)返回的值的int表示形式,该值是一个字符串。 然后,我们迭代四次以获取每八位,并将这八位转换为int。 最后,使用chr()函数将这些int值转换为char。 应该注意的是,我们只能在一行代码中执行此功能,如下所示:
return "".join([chr((fourcc_int >> 8 * i) & 0xFF) for i in range(4)])
CAP_PROP_POS_FRAMES属性为您提供视频文件的当前帧,CAP_PROP_POS_MSEC属性为您提供当前帧的时间戳。 我们还可以使用CAP_PROP_FPS属性获取 fps 的数量。 CAP_PROP_FRAME_COUNT属性为您提供视频文件的总帧数。
要获取并打印所有属性,请使用以下代码:
# Get and print these values:
print("CV_CAP_PROP_FRAME_WIDTH: '{}'".format(capture.get(cv2.CAP_PROP_FRAME_WIDTH)))
print("CV_CAP_PROP_FRAME_HEIGHT : '{}'".format(capture.get(cv2.CAP_PROP_FRAME_HEIGHT)))
print("CAP_PROP_FPS : '{}'".format(capture.get(cv2.CAP_PROP_FPS)))
print("CAP_PROP_POS_MSEC : '{}'".format(capture.get(cv2.CAP_PROP_POS_MSEC)))
print("CAP_PROP_POS_FRAMES : '{}'".format(capture.get(cv2.CAP_PROP_POS_FRAMES)))
print("CAP_PROP_FOURCC  : '{}'".format(decode_fourcc(capture.get(cv2.CAP_PROP_FOURCC))))
print("CAP_PROP_FRAME_COUNT  : '{}'".format(capture.get(cv2.CAP_PROP_FRAME_COUNT)))
print("CAP_PROP_MODE : '{}'".format(capture.get(cv2.CAP_PROP_MODE)))
print("CAP_PROP_BRIGHTNESS : '{}'".format(capture.get(cv2.CAP_PROP_BRIGHTNESS)))
print("CAP_PROP_CONTRAST : '{}'".format(capture.get(cv2.CAP_PROP_CONTRAST)))
print("CAP_PROP_SATURATION : '{}'".format(capture.get(cv2.CAP_PROP_SATURATION)))
print("CAP_PROP_HUE : '{}'".format(capture.get(cv2.CAP_PROP_HUE)))
print("CAP_PROP_GAIN  : '{}'".format(capture.get(cv2.CAP_PROP_GAIN)))
print("CAP_PROP_EXPOSURE : '{}'".format(capture.get(cv2.CAP_PROP_EXPOSURE)))
print("CAP_PROP_CONVERT_RGB : '{}'".format(capture.get(cv2.CAP_PROP_CONVERT_RGB)))
print("CAP_PROP_RECTIFICATION : '{}'".format(capture.get(cv2.CAP_PROP_RECTIFICATION)))
print("CAP_PROP_ISO_SPEED : '{}'".format(capture.get(cv2.CAP_PROP_ISO_SPEED)))
print("CAP_PROP_BUFFERSIZE : '{}'".format(capture.get(cv2.CAP_PROP_BUFFERSIZE)))
您可以在read_video_file_all_properties.py文件中查看此脚本的完整代码。
使用属性来反向播放视频
为了了解如何使用上述属性,我们将了解read_video_file_backwards.py脚本,该脚本使用其中的某些属性加载视频并向后输出,首先显示视频的最后一帧,依此类推。 我们将使用以下属性:
cv2.CAP_PROP_FRAME_COUNT:此属性提供帧的总数cv2.CAP_PROP_POS_FRAMES:此属性提供当前帧
第一步是获取最后一帧的索引:
# We get the index of the last frame of the video file
frame_index = capture.get(cv2.CAP_PROP_FRAME_COUNT) - 1
因此,我们将当前帧设置为读取到以下位置:
 # We set the current frame position
 capture.set(cv2.CAP_PROP_POS_FRAMES, frame_index)
这样,我们可以照常阅读此框架:
 # Capture frame-by-frame from the video file
 ret, frame = capture.read()
最后,我们递减索引以从视频文件中读取下一帧:
 # Decrement the index to read next frame
 frame_index = frame_index - 1
完整代码在read_video_file_backwards.py脚本中提供。 可以轻松修改此脚本,以保存生成的视频向后播放(不仅显示该视频)。 在“问题”部分中提出了此脚本。
总结
在本章中,我们看到使用图像和文件是计算机视觉项目的关键元素。 这种项目中的常见方法是先加载一些图像,执行一些处理,然后输出处理后的图像。 在本章中,我们回顾了该流程。 另外,关于视频流,cv2.VideoCapture和cv2.VideoWriter均被覆盖。 我们还研究了用于视频写作的cv2.VideoWriter类。 编写视频文件时,审查了两个关键方面-视频编解码器(例如 DIVX)和视频文件格式(例如 AVI)。 要使用视频编解码器,OpenCV 提供了四字节代码 FOURCC。 典型的编解码器是 DIVX,XVID,X264 和 MJPG,而典型的视频文件格式是 AVI(*.avi),MP4(*.mp4),QuickTime(*.mov)和 Windows Media Video(*.wmv)。
我们还回顾了 fps 的概念以及如何在程序中进行计算。 此外,我们研究了如何获取cv2.VideoCapture对象的所有属性,以及如何使用它们加载视频并向后输出,从而首先显示了视频的最后一帧。 最后,我们看到了如何应对命令行参数。 Python 使用sys.argv处理命令行参数。 当我们的程序采用复杂的参数或多个文件名时,我们应该使用 Python 的argparse库。
在下一章中,我们将学习如何使用 OpenCV 库绘制基本的和更高级的形状。 OpenCV 提供绘制线,圆,矩形,椭圆,文本和折线的函数。 与计算机视觉项目有关,这是在图像中绘制基本形状以执行以下操作的常用方法:
- 显示算法的一些中间结果(例如,检测到的对象的边界框)
- 显示算法的最终结果(例如,检测到的对象的类别,例如汽车,猫或狗)
- 显示一些调试信息(例如,执行时间)
因此,下一章将对您的计算机视觉算法有很大帮助。
问题
- 什么是
sys.argv[1]? - 编写一段代码以添加
int类型的first_number参数,并包括要使用parser.add_argument()添加的帮助优先编号。 - 编写一段代码,将想象中的
img保存到名称为image.png的磁盘上。 - 使用
cv2.VideoCapture()创建capture对象,以从连接到计算机的第一台摄像机读取。 - 使用
cv2.VideoCapture()创建对象捕获,以从连接到计算机的第一台摄像机读取并打印CAP_PROP_FRAME_WIDTH属性。 - 读取图像并将其保存到名称相同但以
_copy.png结尾的磁盘(例如logo_copy.png)。 - 创建一个脚本(
read_video_file_backwards_save_video.py),以加载视频文件并创建另一个向后播放的脚本(首先包含视频的最后一帧,依此类推)。
进一步阅读
以下参考资料将帮助您深入研究argparse,这是您的计算机视觉项目的关键点:
